Inhaltsverzeichnis
Standard Installation (Personal Versions)
The Java-Editor requires the installation of a Java Development Kit (JDK). Starting with Java 11, you should use the free OpenJDK because the Oracle JDK is subject to a charge. You can download the latest version of OpenJDK from https://openjdk.java.net/projects/jdk/.
Starting from the JDK 10 there are only 64-bit versions of the JDK for which you need a 64-bit version of the Java-Editor in order to use all functions.
As of JDK 11 JavaFX is no longer included in the JDK and must be additionally installed. You can download a JavaFX Windows SDK from https://gluonhq.com/products/javafx/ and install it in parallel to OpenJDK. In the configuration enter the JavaFX folder under Interpreter/JavaFX-folder.
On the page https://www.azul.com/downloads/zulu/zulufx/ AZUL Systems offers 32- und 64-bit versions with integrated JavaFX.
After the installation of the JDK you go on with the download of the Java-Editor. Run the installation program of the current personal version. The Java-Editor will start and is ready to use.
If you receive a security warning from the operating system, you can use an online virus scanner to convince yourself that this security warning is unfounded.
There are some useful extensions for the Java-Editor, which are described under Configuration. So notice the general installation aspects and install the wanted extensions.
Special Versions
Besides the personal installation it is possible to install the Java-Editor as portable software, which runs from a stick, or with the use of ini-files, which is useful for classroom installations.
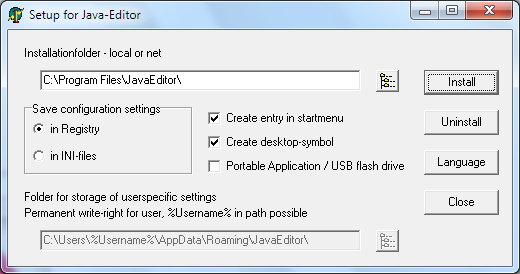
Download the current special version, unpack the zip-file to a temporary folder and run the setup.exe program as administrator.
Select the desired installation folder with the corresponding button. This may be a local folder or a folder in your network. In the latter case you use either the UNC-notation \\Server\NetworkShare\JavaEditor or a network drive letter. Because using the appletviewer with UNC-notation causes problems it's better to use a network drive letter. In a classroom situation the installation in a network folder is prefered, because it is easier to update the Java-Editor and it is possible to make configuration presettings for all users.
Using of INI-files
If you cannot use the registry for storing user-configurations, for example if the computers are protected with a pc-guard, or in a classroom-scenario you use ini-files instead of the windows registry to store configuration settings. In this case the file JEMachine.ini is created in the Java-Editor folder, which contains the protected configuration settings and the global settings for all users. From this file the Java-Editor reads the path of the file JEUser.ini, which contains the user specific configurations.
As you can see in the picture, it is possible to use the variable %Username% to specify the path for JEUser.ini. Normally this path is in the home directory of the user.
To set configurations settings, which are normally saved user specific, global for all users you copy them from a JEUser.ini to the JEMachine.ini file.
Portable software
You can select the option „Portable Application“ to install the Java-Editor as portable software, which runs directly from an usb-stick. The Java-Editor than uses automatically the drive of the usb-stick.
Deinstallation
Use the setup.exe program to deinstall the Java-Editor.

