Inhaltsverzeichnis
Configuration
For some configurations and extensions you need administrative rights. To get them just call the context menu of the Java-Editor link on your desktop with a right mouse click and select execute as administrator.
Open the configuration window with the command configuration in the window menu or just
use the symbol  from the toolbar and choose the desired configuration node in the left tree.
With the Check button you check the existence of all configured folders and files. If a folder or file doesn't exist the corresponding edit field is colored red.
The Dump button exports the whole configuration in a text file. The first lines show which registry entries or ini files are used for configuration. The detailed information can be used to detect configuration problems or to make global presettings in a classroom situation.
Save an edited configuration. Almost all changed configurations are in use then. Only some special things need a Java-Editor restart.
Java
The configuration settings in the Java section are protected. They can only be changed with administrative rights. If you installed the Java-Editor with use of the windows registry the settings are stored in the HKEY_LOCAL_MACHINE (HKLM) hive, else in the ini file JEMachine.INI (C:\Program Files (x86)\JavaEditor\JEMachine.INI oder C:\Program Files\JavaEditor\JEMachine.INI).
The other configuration settings are stored for each user separately, in the HKEY_CURRENT_USER (HKCU) hive or the ini file JEUser.ini.
Interpreter
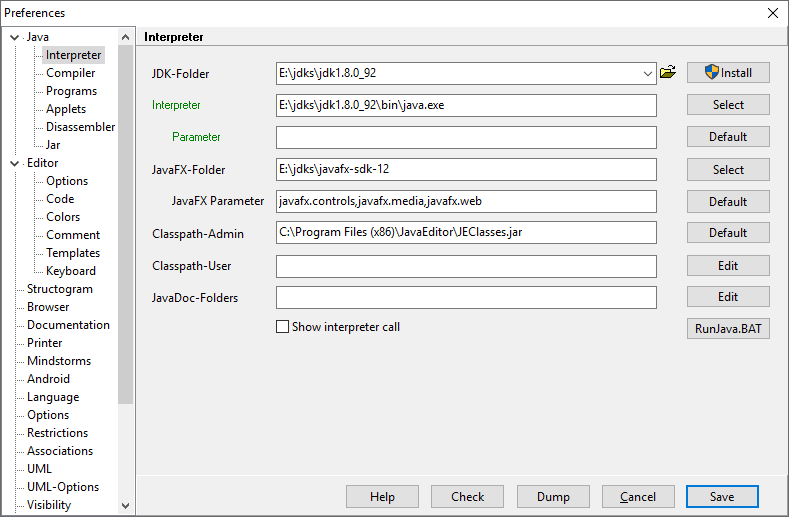
First select the folder with the Java Development Kit (JDK). This folder is used for all depending java tools.
The Classpath-Admin is usually protected.
With Classpath-User you can expand the classpath with jar-files or folders.
In the JavaDoc-Folders field you can set additionally folders with JavaDoc documentations. These are also used for code completion.
The Java-Editor writes a batch file RunJava.bat to start a java program. The button opens the last RunJava.bat file. So you can inspect and modify easily this file in case of unexpected problems. Change @ECHO OFF to @ECHO ON and add more PAUSE commands. Then open with the window menu a new DOS window and start the batch file by input of RunJava.bat. This is an easy way to diagnose problems if a program doesn't start.
Compiler
Here you configure the paths and parameters for the javac compiler.
Use the Make-Modus if automatically all open java source files shall be compiled which are younger than their corresponding class files.
Programs
Applets
On this page you configure the handling of applets. The Appletviewer belongs to the JDK. You can use a browser or the appletviewer to run an applet. Usually the appletviewer is better during program development, because it doesn't use a cache. For flexible handling it's suggested to use the option Appletviewer for java-files and Browser for HTML-files. If your active window contains a java file and you start the applet the appletviewer is used. But if your active window contains the HTML-file of the applet the browser is used instead.
Alternatives are
- use always the Appletviewer
- use always the Browser
Disassembler
By default the disassembler javap.exe from the JDK is used. A better choice is the jad disassembler. Select jad.exe from the disassembler combobox. Then you can install automatically the jad disassembler, provided you have administrative rights (see General aspects).
Jar
On this page you configure the jar tool from the JDK. Usually there is no need to change the options Parameter and Manifest. These options are used for all jar commands. But be aware of the options Create and Pack.
- The start menu contains the command Jar-File Create. This command produces an executable jar file with all files from the current folder with the here configured file extensions. By default only .class files are included. If necessary expand the list of extensions, for example .class .png
- The start menu contains also the command Jar-File Pack. This command packs an archive file (like a zip file) from all files you configure here. Specify your selection or choose one of the options
- all open files
- .java *.jfm *.uml
- .java *.jfm
- .java
- .*
The pack operation supports easy exchange of files between pupils and teacher. A packed jar file can easily be uploaded to a learning-platform or emailed to the teacher.
Editor
Options
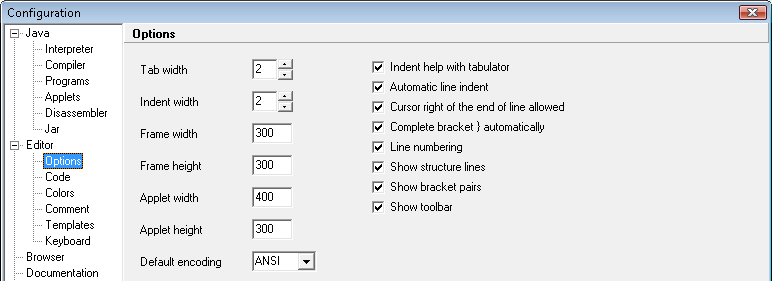
The editor doesn't use tab characters. If a source file contains tab characters they are replaced by the number of space characters you set here. Keyboard input of a tab character is translated to space characters as well.
The indent value is used for indenting automatically generated source code, for example insertion of a control structure or GUI component. By default the value is 2.
Width and height of new Frame, JFrame and Applet windows are set here.
For the default encoding of new source files you have the choice between ANSI, UTF-8 and UTF-16. Search and replace operations are faster if you use the ANSI encoding.
- Indent help with tabulator - the tab key indents to the next word of the previous line
- Automatic line indent - the return key indents to the first non space character of the previous line
- Cursor right of the end of line allowed - the cursor can be positioned beyond the end of a line
- Complete bracket } automatically - if you input a { character the corresponding } character is inserted as well
- Line numbering - a new created source file shows line numbers
- Show structure lines - shows dotted structure lines between mating brackets
- Show bracket pairs - if the cursor is before or after a bracket the mating bracket is marked as well
- Show toolbar - shows the toolbar on the left side of an editor window
Code
Activate the Code-completion and Parameter-hints. The default delay value to show the code completion window or parameter hints is 75 ms. You can change the font of the code completion window with the Font button.
Code completion and parameter hints are only available if the documentation is installed.
Colors
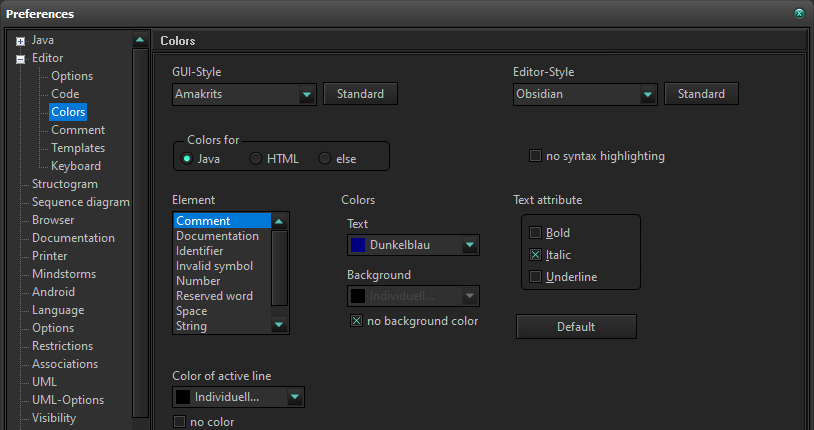
You can choose a GUI style and combine it with an editor style. Before you select styles, you should open a Java source file, because you can then see the styles live when you switch.
Also you can configure the colors for syntax-highlighting of Java and HTML files as well as structure lines and pairs of brackets.
If you select a syntax element on the left side its current foreground and background color and text attributes are shown. Change them as requested with the left button for the foreground and the right one for the background color. The Default button sets the default colors and text attributes.
The GUI and editor styles are located in files in the styles folder of the Java editor. Additional editor styles can be defined in the files DefaultColorsJava.ini and DefaultColorsHTML.ini.
Comment
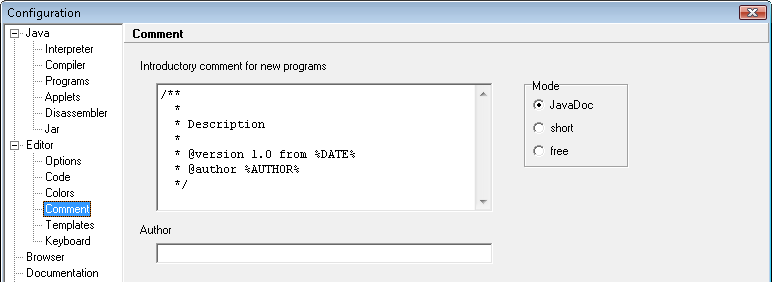
Every new java source file has an introductory comment.
Select the comment style:
- JavaDoc - default JavaDoc style as shown in the picture
- Short - two lines with Author: %AUTHOR% and Date: %DATE%
- Free - free style
Write your name in the author field. It is used as value for the %AUTHOR% variable. The %DATE% variable gets its value from the system date of your computer during creation of a new java source file.
Templates
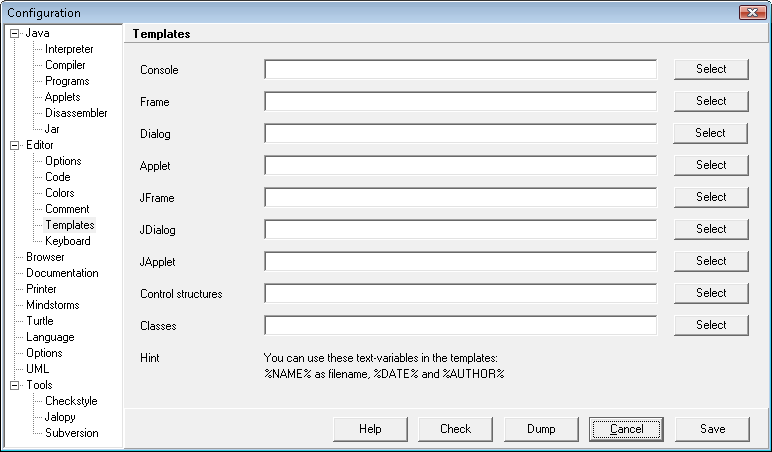
There are many different views about the layout of a java program. If you don't like the templates which are used by the Java-Editor you can specify your own templates, otherwise let the template fields empty. To change a template first download this template collection. Edit the desired one, save it in the template folder and select it on this page.
In a template file you use the variables %NAME% as the file and class name, as well as %AUTHOR% and %DATE%. Place the character | at the initial cursor position. The template should contain start and end sections for inserting of attributes, gui components and methods.
You can use a template file for control structures too. As all control templates are in this template file key of the type #while mark the beginning of a new control template
Keyboard
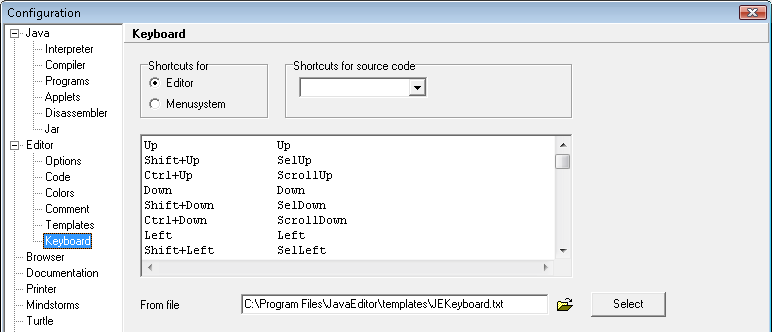
This page shows the shortcuts of the editor and menu-system.
Additionally you can select a text file with shortcut definitions of code templates. In the templates subfolder of your java editor installation folder you find the file JEKeyboard.txt which explains, how to define a shortcut. Use this file for defining your own code templates.
Structogram
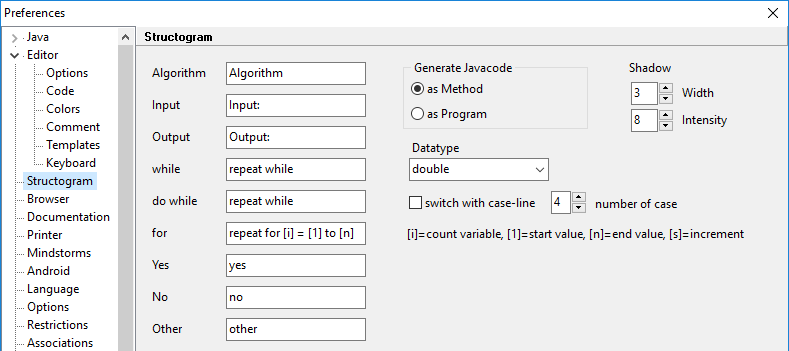
On the page Structogram the texts for the structogram elements, parameters for the control structures switch and for, as well as other settings are configured.
The input and output fields contain the texts that must be used to convert an in-/output into Java source code. The other texts are templates for the structogram elements. For the for-loop, the wildcards [i] = count variable, [1] = start value, [n] = end value, and [s] = step size are used.
Variables whose data type can not be recognized from the structogram are, by default of the type selected under Datatye when converting to Java source code.
Sequence diagrams
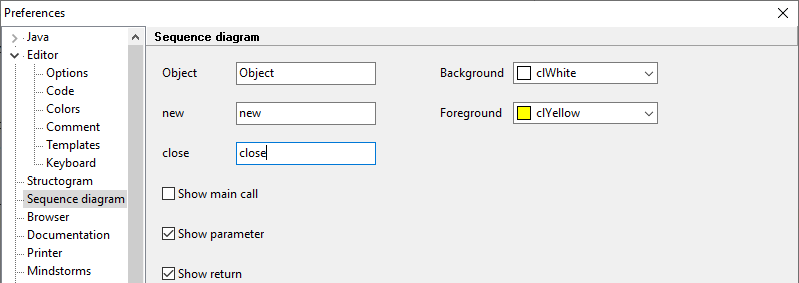
Lifelines are named Object with an attached number. New and Close are the messages for creating or closing a lifeline.
In addition to the method name, the messages to a lifeline can also contain the parameter or the return value if the sequence diagram is generated using the debugger or a UML window.
Browser
You can use the internet-explorer to show the documentation in internal windows of the Java-Editor. The configured external browser is then only used for running applets. Activate „Use only one browser window“ if only one internal browser-window shall be used.
With External browser you can configure a browser like Internet Explorer, Firefox or Opera. For the external browser you have to set Browser title and Keys for „Open Address“ in browser. If you don't use the internet explorer internally the configured external browser is used to show html files.
The proxy configuration is used for the update function and the http access to the java documentation.
Documentation
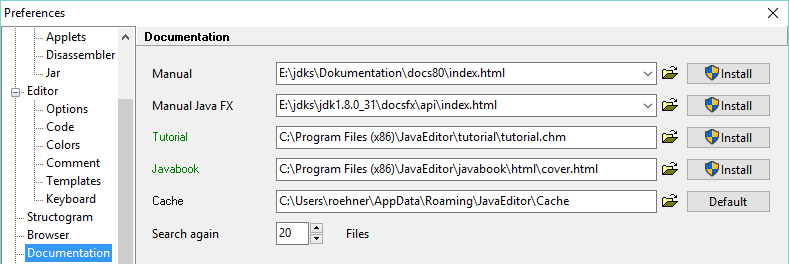
The java manual doesn't belong to the JDK, so you have to install it additionally. The installed java manual gives you easy access to the api documentation. Type the F1 key to get documentation to the text the cursor is on. The documentation is also needed for code completion and parameter hints.
The original JDK 19 documentation from Oracle contains more than 250 MB in about 10000 files. You can get the documentation in just one chm file of just 50 MB from https://javadoc.allimant.org/, but only up to version 8. Select chm from the manual combobox, than you can download and install this chm file with the Install button. Using the chm documentation is especially recommended if you use the Java-Editor as portable software from an usb stick. Check wether it is possible to open the chm-file with doubleclick from windows desktop. If necessary you have to allow to open the chm-file.
As a makeshift, direct online access to the API documentation can be configured without any installation. Use http addresses like https://docs.oracle.com/en/java/javase/19/docs/api/index.html. In this case the used documentation files are cached, that means locally saved.
The Tutorial exists as
- Windows help: https://javadoc.allimant.org/
- downloadable html project: http://www.oracle.com/technetwork/java/javase/downloads/java-se-7-tutorial-2011-07-28-431908.html
- online offer: http://download.oracle.com/javase/tutorial/index.html
German users can install a html based java book from http://www.javabuch.de. Mail me if you know an alternative for your language.
The Cache folder is used if you use direct http access to the java documentation.
Search again is used for the search in the original java documentation .
Printer
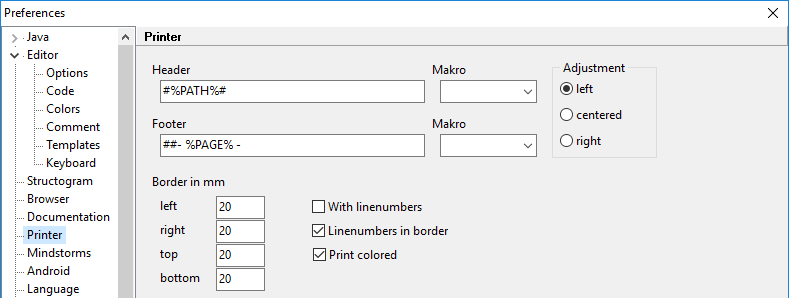
Here you set the print borders, define header and footer line and the using of line numbers.
The header and footer line are partioned in left, middle and right band, which are printed left-justified, centered respectively right-justified. The bands are separated by the # character. You can use the following variables in the header and footer line.
%FILE%   the file name
%PATH%   the file path
%DATE%   the print date
%TIME%   the print time
%PAGENUM%     the number of the print page
%PAGECOUNT%   the total number of print pages
Mindstorms
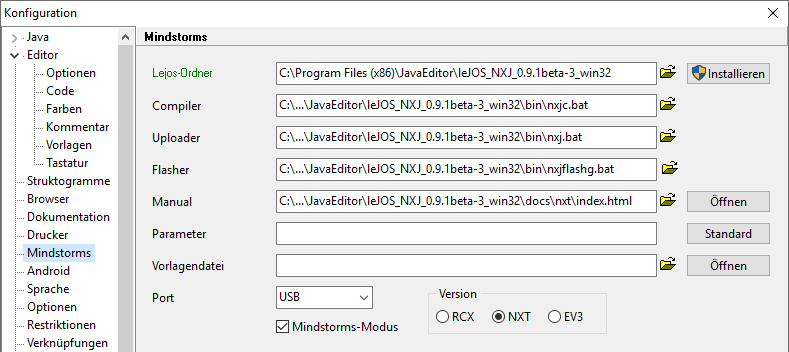
The lego mindstorms models can be programmed with the Java-Editor. Install the Lejos system to the Lejos-Folder. If you do it with the Install button the Lejos documentation is installed as well.
You can use a separate template file for your mindstorm programs. In this template you can use the same variables as in other templates.
Select the used port for the infrared transmitter, usually USB, and your mindstorms brick RCX, NXT or EV3.
For mindstorms programming set the Mindstorms-mode. Then
Concepts of embedding Lego Mindstorms into curricular can be found at Learning with Robots.
For the parallel use of the Java-Editor in normal and mindstorm mode in a school, create a copy of the JEMachine.INI for the use of Mindstorms. In this JEMachineMindstorms.INI you configure the Mindstorm parameters. On the students' desktop, create a shortcut to the Java-Editor using JEMachineMindstorms.INI as the call parameter.
Starting with the JDK 9, the compiler parameter -bootclasspath used by Lejos is no longer supported. You get the error messages when compiling:
error: option --boot-class-path not allowed with target 9
error: option -extdirs not allowed with target 9
Open the batch file nxjc.bat to compile and replace at the end:
"%JAVAC%" -bootclasspath "%NXJ_CP_NXT%" -extdirs "" %*
with
"%JAVAC%" -classpath "%NXJ_CP_NXT%" %*
Android
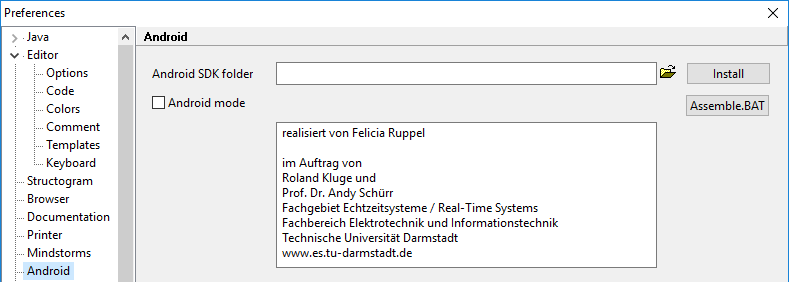
For the simple Android support described in Android select the Android JDK path here and change the Java-Editor to Android mode.
Language
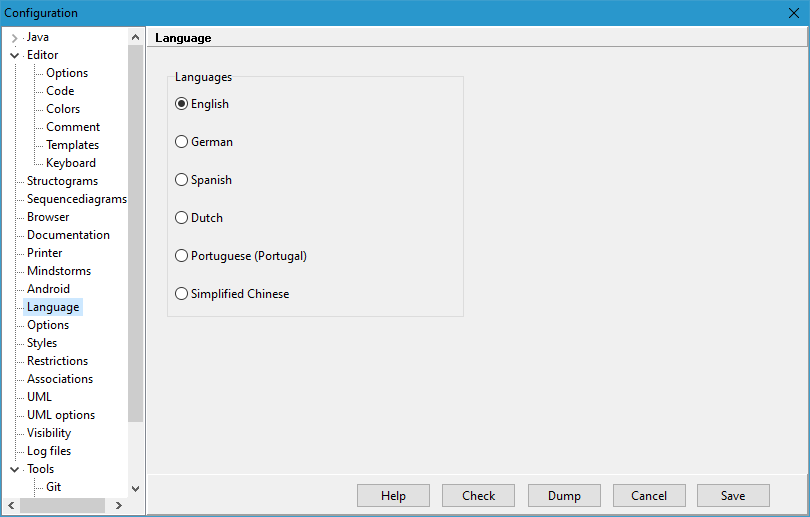
Select the desired language file from the language subfolder. With the help of a language-file you can change used terms.
To create a new language file make a copy of the file english.ini, name it with your language and select it as new language file. If you open the new language file you see that the lines have the structure name=value. Translate the value parts.
The Translate button supports the creation of a new language file. It compares your file with the english.ini file and marks all lines which are identical in both files. Identical lines are not translated or sometimes should not be translated.
To update a language file use the compare tool from the tools menu and compare the old with the new language file.
Options
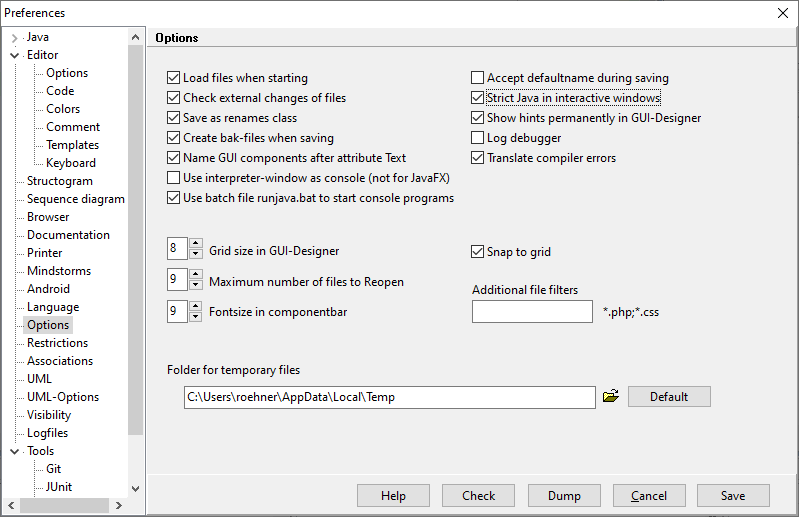
This page is for configuring miscellaneous settings.
- Load files when starting - load last open files at program start
- Check external changes of files - Checks if downloaded files have been changed by external programs
- Save as renames class - if you save a class with a new file name, the name of the class changes accordingly
- Create bak-files when saving - create a backup file when saving a file
- Name GUI-components after attribut „Text“ - If you change the Text attribute in the Object Inspector, the name of the GUI component will be set accordingly
- use interpreter window as console (not for JavaFX) - The input / output takes place in the interpreter window of the Java-Editor, not in a separate console window
- use batch file runjava.bat to start console programs - By default, the batch file RunJava.bat is used, which has a PAUSE command at the end, so you can view the output on the console. If the use of batch files is disabled, disable this setting and exit your console program with an InOut.readln();
- Accept defaultname during saving
- Strict java in interactive windows - Instructions must be entered in interactive mode with a closing semicolon.
- Show hints permanently in GUI designer - Display information about GUI components when moving over them with the mouse.
- Log debugger - log the debugger output to a text file
- Translate compiler errors - In the editor window, the marks indicate translated texts for compiler errors.
- Additional file filters - the open dialog shows also files witch match the additional file filters
- Font-size in component bar - set the desired font-size for the component bar, default font size is 9
- Folder for temporary files - this must be a folder with write access, use Default
Restrictions
For safety reasons it is possible to deactivate the use of DOS-Windows, the internet access and to lock all configuration paths.
Associations
By default the file extensions .java, .jfm (gui form), .uml (uml file), .jep (project) and .jsg (structogram) are associated with the Java-Editor. You can check some more extensions or add some literally. Use the button „Change“ to add or delete extensions.
„Association of Java-Editor“ shows the actual Java-Editor path.
UML
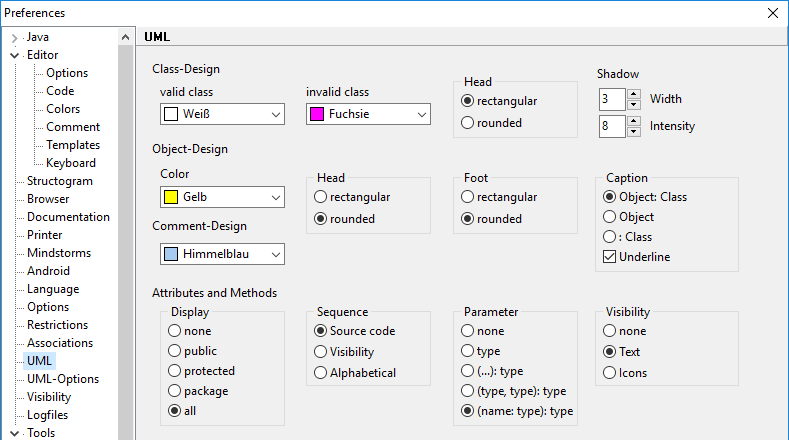
On this page you configure the layout of classes and objects for the UML window.
As a visual feedback, classes with a valid or no longer valid .class file are color-coded. If a java file is changed, e.g. if an attribute is added, the class file used for interactive work in the UML diagram is no longer valid and is displayed in red. Compiling the java file creates a class file that also contains the additional attribute. The head of the class is displayed in white and you can again create objects of the class. In the UML window you can compile a class via the context menu.
In the „Attributes and Methods“ section you specify the default representation for attributes and methods. This includes which ones are displayed at all, the order, the degree of detail for parameters and the visibility.
UML-Options
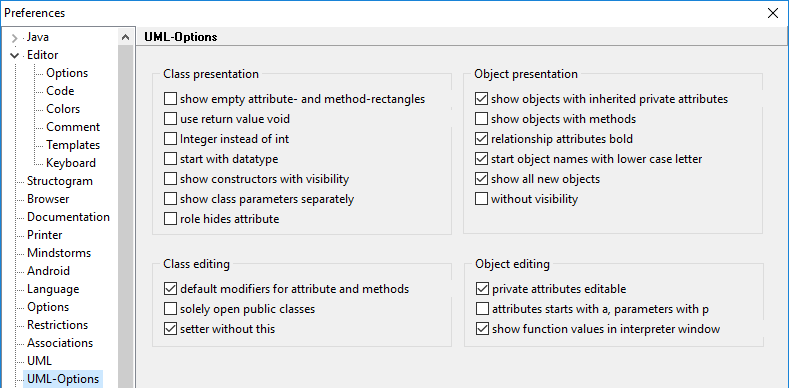
Class presentation
- show empty attribute- and method-rectangles - if there are no attributes or methods in a class, the rectangles can be shown or hidden in the class diagram
- use return value void - methods without return value are displayed with void
- Integer instead of int - the data type int is UMLcompliant shown with integer
- start with datatype - UML compliant a parameter begins with the name followed by the data type. In Java the data type precedes the name of the parameter.
- show constructors with visibility - constructors can be represented by a C or by visibility as with methods
- relationship attributes bold - in class relations the relationship attributes are given in bold
- show class parameters separately - for a parameterized class the parameter can be displayed in the top right-hand corner
- role hides attribute - role names of a class relationship can hide attributes with the same name
Object presentation
- show objects with inherited private attributes - for objects inherited private attributes are also displayed with their values
- show objects with methods - normally you only represent objects with their attributes and attribute values
- start object names with lower case letter - automatically generated object names begin with lowercase letters
- show all new objects - if a constructor or a method is called all new objects created in the process can be displayed automatically
- without visibility - attributes of objects are displayed without visibility
Class editing
- default modifiers for attribute and methods - sets the visibility in the class modeler to public, the type of a new method to procedure and chooses the get method for attributes
- solely open public classes - when opening files in the UML window private classes contained within them are not displayed
- setter without this - defines how set methods are implemented
this.Attribute = Attribute;orAttribute = AttributeNew
Object editing
- private attributes editable - the context menu of an object allows you to edit attributes, but you can exclude private attributes
- attributes starts with a, parameters with p - an option for source code generation with the class modeler
- show function values in interpreter window - or in a separate function value window
Type binding
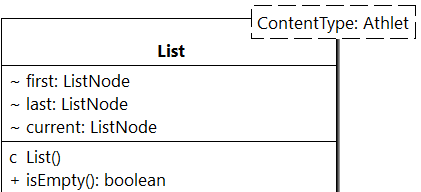
A generic class has a type parameter which can be displayed separately in the right upper corner. You can add a type binding to this type parameter by double clicking it.
In this example ContentType is the type parameter and Athlet the type binding.
Visibility
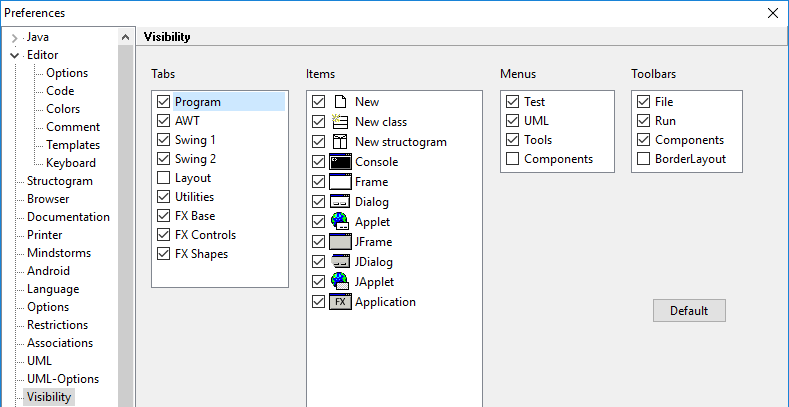
Here you can specify which tabs, items on the tabs, menus and toolbars are displayed.
You can hide entire tabs or individual items on a tab. Select the desired tab to display its elements. By default, the Layout tab, the Components menu, and the BorderLayout toolbar are turned off.
In a PC room, you can achieve reduced availability of tabs, components, toolbars and menus on all PCs. The prerequisite is that you have installed the Java-Editor as recommended in a PC room with the use of INI files. First, let the configuration data be output with the „Output“ switch. You will find the visibility settings in the form
[Visibility]
Tabs=111101111
Program=11111111111
AWT=111111111111111111
Swing1=1111111111111111111
Swing2=11111111111111111111
Layout=111111
Utilities=111
FXBase=1111111111111111111
FXControls=111111111111111111111
FXShapes=11111111111
Menus=1110
Toolbars=1110
These are copied to the file JEMachine.INI or to a teacher, room or course related INI file with which the Java-Editor is called. The easiest way to do this is if the Java-Editor is started from a server, because then you only have to change one single JEMachine.INI file.
Logfiles
You can create logs of compiler calls, errors during interactive work in UML windows and Java-Editor exceptions.
Select the log files here. In the paths you can use the variable %USERNAME% for example:
C:\Users\%Username%\AppData\Roaming\JavaEditor\Log\JELogfileExceptions.txt
If you have the necessary write access, you can store the logs of a computer room centrally on a server.
Tools
Git
Git is a version control system which supports the work with local and remote repositories. It is used to control versions of sourcecode files.
The git-homepage has the address https://git-scm.com/
Under Git folder you enter the folder of the previous installed Git program. Repository local is a folder for local repositories. A remote repository can be cloned. The name of the cloned repository is appended to Repository local.
After installation of git the tools menu will be expanded with a git menu. In an editor window you call git commands from the context menu.
JUnit
JUnit is a unit testing framework for the Java programming language.
The JUnit homepage has the address https://junit.org/junit5/
To use JUnit you have to install the a junit-platform-console-standalone jar file. After installation of this jar file tools menu will be expanded with a JUnit menu. The easiest way to use JUnit is from an uml window. You can create a test class through the context menu of a class. the test class contains a BeforeEach- or AfterEach-method according to your configuration. From the context menu of a test class you can run all or one selected test.
If you run a test class from the editor all tests are executed too.
Checkstyle
Checkstyle is a development tool to help programmers write Java code that adheres to a coding standard. Look at http://checkstyle.sourceforge.net/ for further information.
You can automatically install the Checkstyle package and a configuration file mycheckstyle.xml. This configuration is not as strict as the configuration file sun_checks.xml from Sun.
Jalopy
Jalopy is a source code beautifier. Checkstyle only checks whether the source code meets the coding standard, whereas Jalopy rewrites the source code according to the desired coding standard.
The homepage of the Jalopy project is at http://jalopy.sourceforge.net/. For the Java-Editor you need the Console-Plugin.
The automatic Jalopy installation also installs a xml file with a coding standard suitable to the Java-Editor. Execute the preferences.bat file if you want to change this standard.
Subversion
Subversion (SVN) is a version control system. It is used to maintain current and historical versions of source code files. The subversion homepage is at http://subversion.apache.org/. Due to affordable e-mail-registration there is no automatic install process.
After installation the tools menu is expanded with a subversion menu.

